Material Studio Pro Manual
Version 1.5.3Riendly Material Studio Pro is designed to be the easiest way to turn your folder of textures into beautiful preview renders. Go from “folder of files” to “professional portfolio” in 4 easy steps.
Before you begin
Prerequisites
Before you start, make sure you have Blender 4.3 (or later) installed on your computer. Riendly Material Studio Pro uses Blender's engine to do the heavy lifting!
Step 1
Connect Blender & Folders
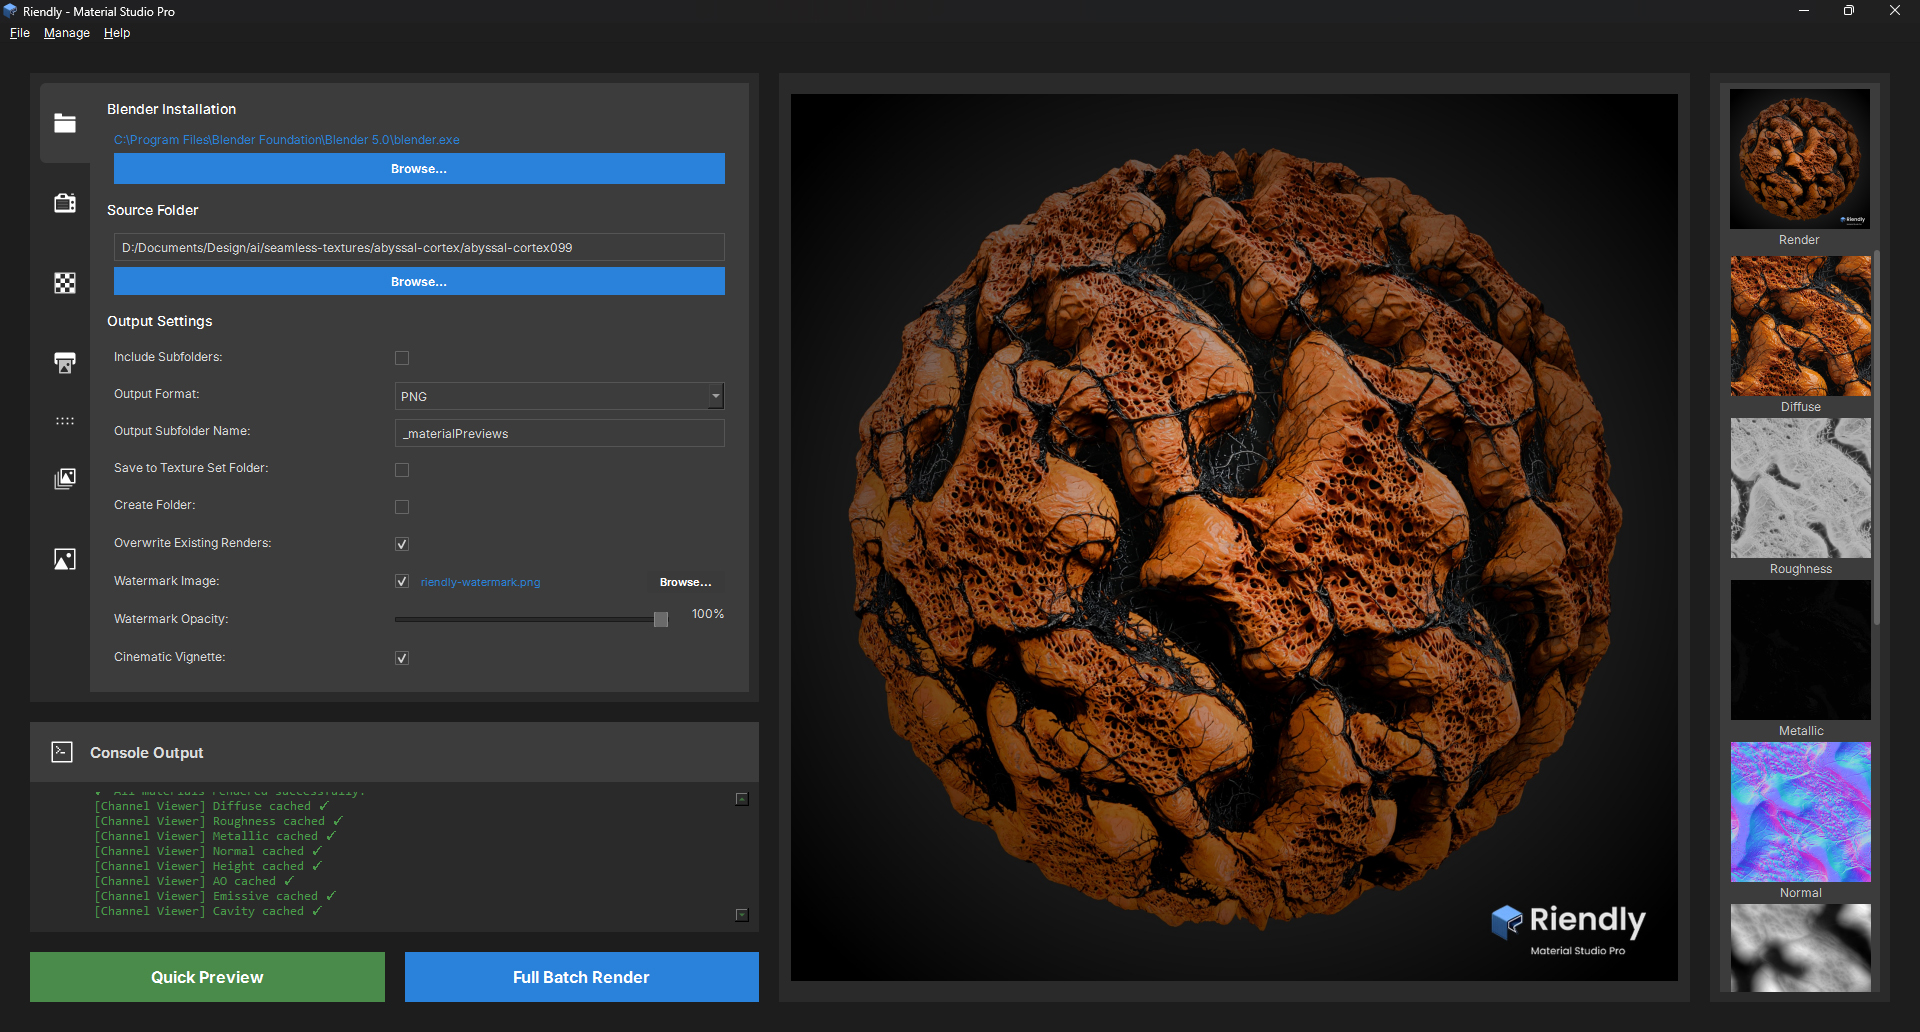
Blender Installation
Click Browse to point to your Blender.exe.
The default location is pre-selected & only change it if you installed Blender in a custom location.
Source Folder
Select the folder where your texture files are located.
Output Settings
- Include Subfolders: If your source folder contains other folders with texture sets, enabling this allows Material Studio Pro to find them all automatically.
- Output Format: Choose the file format your renders will be saved as &- PNG, JPEG, TIFF, or EXR. PNG supports transparency; EXR preserves HDR data.
- Output Subfolder Name: The name of the subfolder created inside the source folder to store rendered previews. Defaults to
_materialPreviews. - Save to Texture Set Folder: Instead of a shared output folder, saves each render directly alongside the textures it was generated from. Useful for keeping previews with their source files.
- Create Folder: Automatically creates the output subfolder if it doesn't already exist.
- Overwrite Existing Renders: When unchecked, any texture set that already has a render in the output folder will be skipped. Useful for resuming a batch without re-rendering everything.
- Watermark Image: Overlay a transparent PNG onto every render before saving. The checkbox enables it; Browse… lets you pick a custom file. The bundled Riendly watermark is loaded automatically if no custom file is set. See Watermark & Vignette below.
- Watermark Opacity: Controls watermark visibility from 0% (invisible) to 100% (fully opaque), in 5% steps.
- Cinematic Vignette: Applies a smooth radial darkening to the edges of each render. Applied under the watermark so your branding is never affected.
Step 2
Lighting & Environment
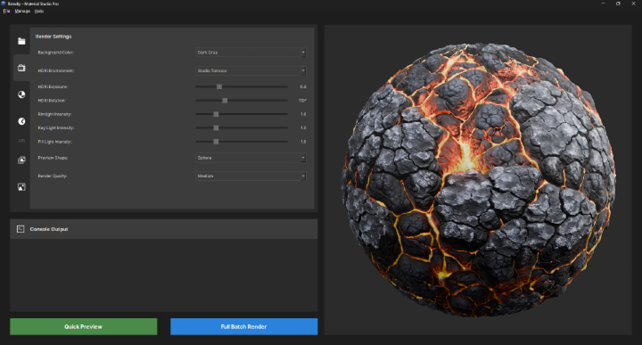
Render Settings
- Background Color: Choose a solid colour behind the preview - Dark Gray, Light Gray, Black, White, Studio Gradient, or Transparent (PNG with alpha channel).
- HDRI Environment: Pick a studio lighting setup. The HDRI affects both reflections and overall scene brightness. Set to None for pure solid-colour lighting.
- HDRI Exposure: Adjusts the brightness of the HDRI. Lower values give a darker, more dramatic look; higher values lift the whole scene.
- HDRI Rotation: Rotates the environment map horizontally, repositioning specular highlights and reflections on the surface.
- Rimlight / Key Light / Fill Light Intensity: Additional area and sun lights for bringing out edge separation, surface detail, and shadow depth. All default to 1.0; set to 0 to disable any individual light.
- Preview Shape: The 3D mesh used to display the material - Sphere, Cube, Cylinder, Cloth, Floor Plane, or Sphere + Floor.
- Color Management: Filmic (recommended - best for emissive and bloom), AgX (photographic, suppresses bloom), or Standard (no tone mapping).
- Add Subdivision Levels: Adds 0-4 extra subdivision levels on top of the quality preset's base mesh. Increase this when displacement maps look faceted at Medium quality without needing to jump to High or Ultra - note that higher values significantly slow the render.
- Lighting Preview: Renders a neutral grey sphere using EEVEE so you can dial in HDRI and light settings without running a full material render. Refreshes automatically when you adjust any lighting control.
Render Quality
How detailed your output image will be:
| Level | Resolution | Samples | Subdivision |
|---|---|---|---|
| Low | 512 × 512 | 8 | 3 levels |
| Medium | 1024 × 1024 | 16 | 4 levels |
| High | 2048 × 2048 | 32 | 5 levels |
| Ultra | 4096 × 4096 | 64 | 6 levels |
Step 3
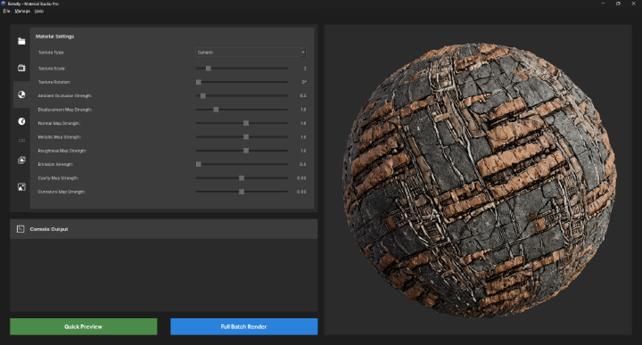
Material Calibration
This is where you tweak how the material feels. Use the sliders to adjust the global strength of your maps:
- Texture Type: A list of presets that automatically adjust the slider values for all texture maps to give the best output render.
- Texture Scale: How many times the texture is repeated on the material preview primitive.
- Texture Rotation: Rotate the material to get your desired render angle.
- Displacement Map Strength: How bumpy or deep the texture looks. A displacement map is a grayscale image that physically raises and lowers a surface's geometry based on its brightness.
- Displacement Map Blur: Apply a gaussian blur to the height map before it is passed to Blender's displacement modifier. This is useful for height maps with sharp transitions, smoothing them without visibly softening the overall displacement detail.
- Normal / Metallic / Roughness: Fine-tune the surface details and shininess.
- Emissive Strength: Default is 0 (off). Increase this if your textures include an emissive map to create a glowing effect.
- Cavity / Curvature Map Strength: Additional sliders to take advantage of extra texture maps you may have.
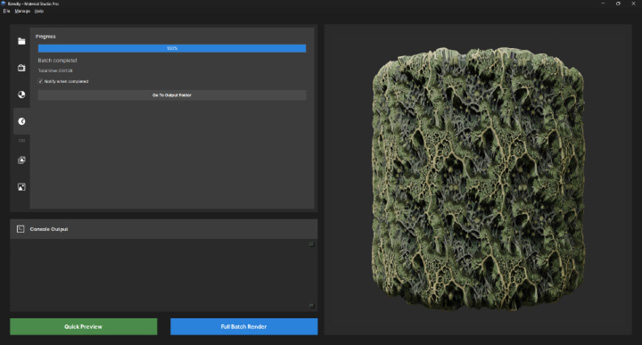
Step 4
Render!
- Test it first: To see a low-quality sample of how your renders will look with the chosen settings, click the green Quick Preview button. The app will render just one material so you can check your lighting and settings before committing.
- Do it all: Happy with the preview? Click the blue Full Batch Render button. Sit back and watch the progress bar zip through your entire library!
Need Help?
If you get stuck or find a bug, drop us a line at
jay@pollycreative.com.
Happy Rendering!
New Feature
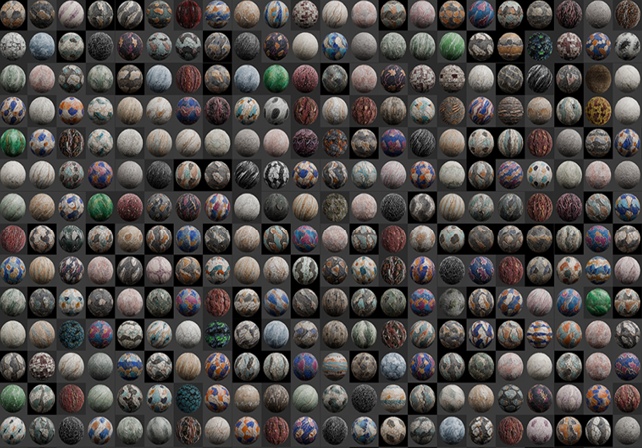
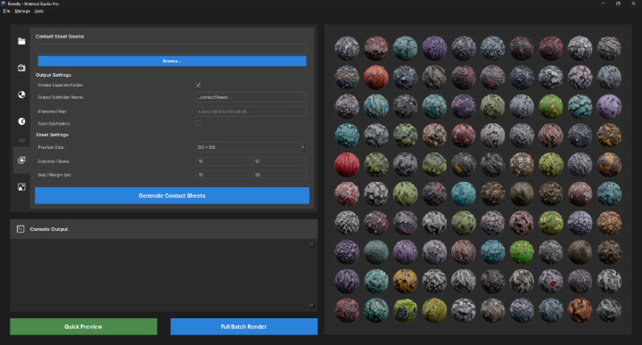
Contact Sheet Maker New
Generate a contact sheet image containing a grid of all your rendered material previews.
- Source Directory: Use Browse... to select the root folder containing your generated material previews.
- Create Separate Folder: If checked, Riendly will create an output folder alongside your textures to avoid cluttering your texture directories.
- Number of Sheets: Specify how many contact sheets to generate. If your texture library exceeds the grid capacity, multiple sheets will be automatically created.
- Columns × Rows: Smart grid selector with pre-calculated factor combinations (e.g., 4×25, 5×20, 10×10). Automatically suggests balanced layouts based on your texture count.
- Random Order: When checked, randomises the order images are placed on the sheet. Off by default - enable for varied arrangements, leave off for alphabetical order.
- Scan Subfolders: Check to recursively search for images in all child directories of the Source folder.
- Preview Size: The pixel dimensions of each thumbnail cell on the sheet. The overall sheet size is calculated automatically from this value, your column/row count, and gap/margin.
- Gap / Margin (px): Gap is the space between cells; Margin is the border around the whole sheet. Both default to 0 for a clean borderless grid &- increase either to add breathing room.
- Generate Contact Sheets: Press the button to generate the image(s).
v1.5.1
Watermark & Vignette New
Watermark
The Watermark Image row in Output Settings has a checkbox, a filename label, and a Browse button. The checkbox defaults to on and the bundled Riendly watermark is pre-loaded - your renders will carry the watermark straight out of the box. To use your own branding, click Browse... and select a transparent PNG.
The Watermark Opacity slider below it runs 0-100% in 5% steps. Drag it left to fade the overlay in; drag right to make it stronger. At 0% the watermark is completely invisible even if the checkbox is on - use this to temporarily suppress it without unchecking. To disable the watermark entirely, uncheck the checkbox.
Tip - custom watermark sizing:
The watermark PNG is stretched to match the render resolution before compositing. For the cleanest result, prepare your watermark at the same aspect ratio as the rendered output - 4096 X 4096.
Cinematic Vignette
The new Cinematic Vignette slider in Output Settings allows you to apply a smooth radial darkening to the edges and corners of every render. The falloff is very gentle in the centre, darkening progressively toward the corners. The vignette is composited before the watermark, so your branding layer is never affected by the darkening.
Add Subdivision Levels
Found in Render Settings, this slider (0-4) adds extra mesh subdivision on top of whatever the selected Render Quality preset provides. Use it when displacement maps look faceted at Medium quality: instead of jumping to High (which doubles the resolution and quadruples render time), nudge this to 1 or 2 for smoother geometry at your current resolution.
Each additional level multiplies polygon count, so render times increase. Start at 1 and only go higher if you still see faceting.
New Feature
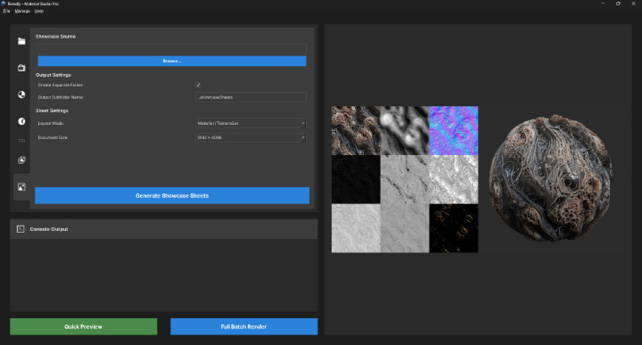
Material Showcase New
Generate polished showcase sheets that combine your material renders with texture maps in a single document.
- Source Directory: Use Browse… to select the root folder containing your generated material previews and texture maps.
- Create Separate Folder: If checked, Riendly will create an output folder alongside your textures to keep things organised.
- Filename Filter: Enter a partial string (e.g.
materialPreview_) to include only materials whose filenames contain that string. Default ismaterialPreview_. Leave blank to include all. - Layout Mode: Choose the layout for the showcase sheet - either a Texture Set (3×3 grid of your textures + material preview) or a Material Preview and Diffuse Map layout.
- Document Size: Choose the resolution for the generated showcase image.
- Generate Showcase Sheets: Press the button to generate the image(s).